Sunday, March 25, 2012

ASG Industry Day and other ramblings

Creating stand alone flowers.
Lots to catch up on ... firstly the Industry Day yesterday at Niagara Park ... First speaker was Sally Sommer from ZIG ZAG sewing. She spoke about stabilisers for Machine Embroidery. WOW - what a minefield of possibilities!! Sort of glad I'm not into that,  though the work is quite amazing and there are lots of creative possibilities.
Embroidery on jeans.


AMAZING - embroidery on a plastic umbrella.

More stand alone work - started on water soluble stabiliser.

Making little boxes from machine embroidery.


Then a little fabric shopping - Rosemary from Chic Fabrique was there with a lovely selection of fabrics - I went all lacey with blacks and creams ... she really does have the most fabulous fabrics at fantastic prices - if you haven't been there yet ...... what are you waiting for????


Inspired by some lacey pics from our recent Sunday papers .....

Then we heard from Christine who makes bags and purses in an upcycling method - she uses old zips and old everything to create some really sweet looking bags - she sells at markets and on Facebook.
Our last speaker was Nola Sterling from Victoria - this lady was amazing, she must eat, sleep and drink at the sewing machine - she's into machine embroidery, machine felting, making fabric, and a million other things.


Machine Felted but constructed by HAND!
Now, back to some of my sewing. At TAFE we constructed a Magyar knit block pattern from our direct measurements, they gave us the fabric to sew it up.

We also made up this Size 10 Sleeveless Top - fabric from TAFE - or quite possibly from Corporate wear donations ....

Anyway, I thought I'd make it up at home also. I chose this brown cheesecloth with pink embroidered flowers - from The Fabric Store - and if my memory is correct it's a Lisa Ho fabric .... we did a neat way of finishing the armhole edges with bias binding. So, the darts have been sewn, the neck facing has been attached, and before you sew the side seams ...

Take a pice of bias binding and PRESS one folded edge open to form or mould the shape of the armhole edge.
Stitch on to the RS of the fabric - 6mm seam allowance.
Then sew and overlock the side seams together (or apart if you want).
Trim the bulky corner.
Turn the binding to the wrong side and stitch down - I think I should have understitched before this step - we basically understitch everything!!! Anyway, it's a neat an easy way to get those raw edges tucked in!
I also like the way they drafted the back facing to be quite deep at the CB - this allows for the label to be prominently positioned and it looks really neat on the coat hanger - I guess from a retail point of view that's a good consideration - but also good to wear a facing a little deeper. That's the white interfacing you can see.
Anyway, after all that - it didn't fit!!! That fabric stretched and stretched - hmmm.......
So I made another one in a much better fabric - and this behaved beautifully, although it was a leftover from another project, so I couldn't make it any longer - but that's OK. It's a stretch cotton sateen. Worn here with my Clovers from Colette Patterns - yet to blog about them - this was my 2nd attempt - and these are Size 8. Hope to make up another longer pair and yes, hope to blog about them.
Lastly, this little pink number is a toile for a Pattern Modification - adding a yoke and a front inverted pleat, moving and eliminating some darts, drafting the waistband ...... phew ..... learning is exhausting!

Monday, March 12, 2012

Another Burda 104 5/08 and Heidi's Giveaway ....

This time ...... no facing, no lining, added a red stretch binding to the V Neck, added sleeves from my Style Arc Laura Dress Pattern.  Too easy!

Looks kinda frumpy in the photos, but it didn't feel frumpy .... or maybe I'm just kidding myself ...... this blogging stuff really makes you paranoid!!! ..... have a great week!

ETA...... well, I just found that the lovely Heidi is giving away a copy of her new book ...... head on over to enter ....... I hope she has a section on reducing "frumpiness"!!

Sunday, March 11, 2012

15 Candles

My Sweet Pea turned 15 this week.
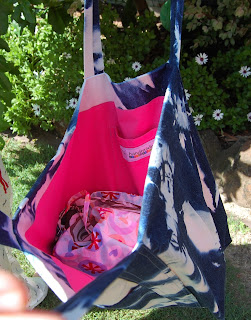
She quite liked the Tote Bag that I made at TAFE a couple of weeks ago (it was our introductory machining lesson) and she asked for the bleached denim fabric .... so voila!
A simple design, and no interfacing, makes this a lightweight and easy going bag that holds heaps. So that's the last of my bleached denim for the time being.
Another project at TAFE this week involved adapting an easy fit pant pattern - that we drafted from direct measurements .... into some cute boxer shorts  - perfect timing for my little miss ....so I added some ruffles, trimmed a trouser pocket and added a back patch pocket.

So, apart from all that ..... in our pattern modification class we did some sleeve variations ... puffed sleeves, gathered sleeve head and flared sleeve. Fun, fun, fun!

Sunday, March 4, 2012

Burda Dress 104 5/08

 I'm probably the last person in the universe to get around to this dress pattern. 2008!! Anyway, this dress gets the thumbs up on Pattern Review, and from me too .....
 A stretch knit dress with a front detail secured by a buckle.
 I used a Martin & Savage fabric, 95% polyester & 5% lycra - super soft, it never ceases to amaze me how synthetic fibres can be made to feel "non synthetic" - this fabric is a perfect example. I lined the dress with a knit lining - very lightweight. The dress has a fairly full front and back neck facing - so it was very easy to cut a lining and attach it to the bottom of the facing. I made size 38 - no adjustments except for about 5cm extra in length - as a few others did too.
 I left out the zipper, as did the rest of the sewing world. Just a note on using a twin needle on knits - always lower the top and bobbin tension - the stitch on the left is normal tension and the one on the right has lowered tension. It makes that ridge disappear.

And so .... an update on my TAFE adventure thus far ..... having spent 4 hours finishing my drawing homework today, I'm probably not in the best frame of mind to give an accurate report .....we've been doing those technical drawings of flat garment and garment components- Front and Back views  - like the line drawings above .... but by hand!!! We move on to computer drawings later, but I guess we have to start with an appreciation of how they must be drawn .... very tedious indeed!
 
Apart from that, all is good!! The purple book above is our main text - Aldrich's Metric Pattern Cutting for Women. We've used direct measurments to draw the Easy Fit Jersey Bodice Block and Sleeve, and last week we adapted it to a Magyar Block and we cut out some knit wintery fabric (it was a 35 degree day - phew!!), so that's all interesting and quite straight forward - you can even use all of your own direct measurements to get a customised fit - so I'm sure I'll have a go at that myself if we don't do it in class.

On the sewing front, we use a machine similar to the one pictured - a Siruba - fast, automatic back tack, automatically trims the thread and raises the presser foot when you're finished, even though it's fast, it's easy to go very slow as well, so not scary at all! I've made two basic tote bags, done basic machine samples, and we made a Child's Size 8 pair of boxer shorts with a patch pocket and in seam pockets. Next week we can modify the pattern to our own design and bring in our own fabric to make some cute Peter Alexander style boxers (for my teenage daughter) - so that will be fun.

Everything we do, has to be accurate - we work off Specification sheets - so all the measurements and seam allowances have to be spot on - otherwise it won't pass the Quality Check!!!

In the Pattern Modification class, we've done some samples of adding yokes, gathering and pleats to a basic bodice block - the interesting thing here is that designers obtain their fabric FIRST, then pattern make from that point ... because the patterns have to reflect the nature of the fabric eg. gathers in different weights of fabric require differing amounts of "extra" fabric to achieve the desired gathered look!

We've also adapted a bodice block for a scoop neck and facing - making the adjustment for a gape dart. So there you have it..... and a big thanks to all those who left encouraging comments on my last post .... I am very lucky to have the opportunity to dive deeper into an area that I love! So onward and upward and I hope your week is fruitful!