One minute you're grinning from ear to ear with a new babe in arms and the next minute you're sewing a suit for his Year 10 Graduation ....
 |
| 1994 - and I made that dressing gown!!! |
Pattern: Burda 8186
Sizing: From direct measurements he was a 36 only for the waist, and 34 for everything else. I cut a 36 for the pants and a 34 for the vest and jacket. I did a tissue fit and added 5cm in length for the sleeves of the jacket. The pants were a bit tight at the waist so I had to take off the waist band and take out side seams and CB seam - add a little extension to the waist band at CB - and all was good elsewhere.
Fabric: Vest fabric from Tessuti's Sydney - textured polyester - lined with Habotai Silk from Gorgeous Fabrics. Pants and Jacket fabric wool plus Lycra from The Fabric Store Sydney - very fine and lightweight - in hindsight I would have preferred a wool without the Lycra - I think that the Lycra limited the pressing and steaming qualities that wool has on it's own. For the jacket I block fused the following pieces:
- Front
- Side Front
- Front Facing
- Back Neck Facing
- Under Collar
- Collar stand
- Top Collar Pocket welts and flaps
- I also fused interfacing on the hem allowance of the the back, side back and sleeve.
I cut the under collar on the bias ( not suggested by the pattern) and it all fitted very well.
Jacket was lined with Silk Satin.
Instructions: The instructions are very brief - but adequate if you've made a jacket previously.
Some details:
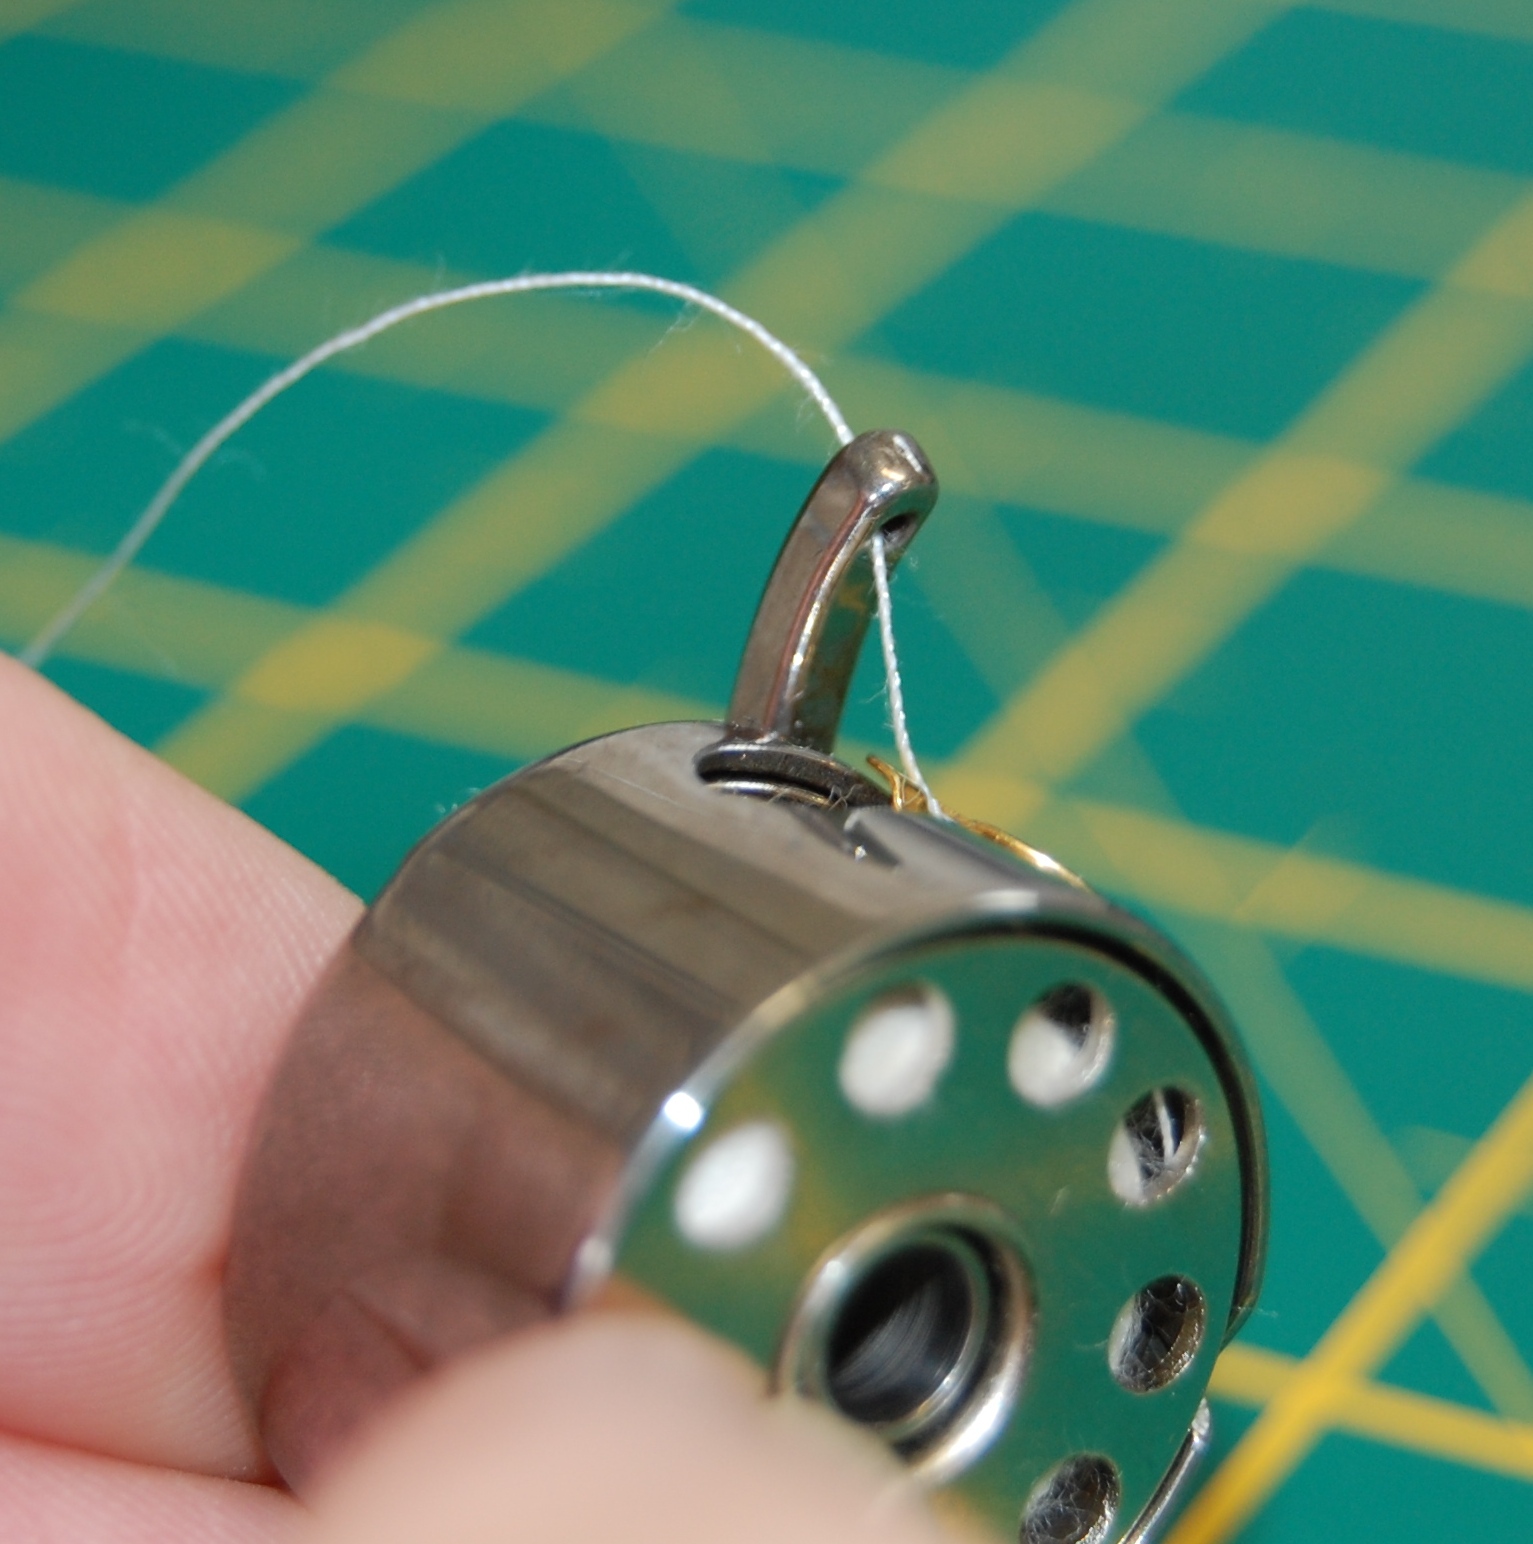
This is a bobbin case for my Bernina machine - the hole in the finger is for the bobbin thread when you're sewing buttonholes.
Corded buttonholes - the cord (Perle 8 Crochet Cotton) is placed at the back of the foot and then travels under the foot to be secured at the front of the foot while the machine stitches over the top of it.
Then you need to pull through the threads and tie off before snipping.
I used this shiny thread on top.
Preparation for welt pockets:
Key hole Buttonholes on jacket:
I used 2 strands of Rasant thread and a size 100 needle.
And no, I didn't make the shirt or the tie! This was a time consuming and high stakes project to tackle, but I enjoyed it very much because it was an important project for an important person!!! I think it's a very good pattern - each items fits well - and I'm glad I added that extra length to the jacket sleeves.
Time now for a little observation of the changing seasons ....


Wow, what a fantastic job, the suit looks great. Congratulations to your son.
ReplyDeleteWow great job mum! They grow up so quickly don't they? I've got a daughter in year 9 and a son who won't stop growing. :)
ReplyDeleteYou should be proud......and so should he. Great job.
ReplyDeleteWhat a gorgeous, suit, I'm in awe! I hope he gets to wear it for a while yet (I'm sure he's still growing...?) And congratulations on such a handsome son, and on his graduation.
ReplyDeleteYou are freaking amazing.....
ReplyDeleteWow! The suit is amazing. Congratulations on your sons graduation! What's next?
ReplyDeleteYou not only made an amazing suit the son you made to go in it is gorgeous - well done!
ReplyDeleteWow - making a suit - you are so inspiring! Congratulations to your son on his graduation and best wishes for his future endeavours. They certainly grow up fast!
ReplyDeleteMy son had his final year 12 exams this week.
Awesome... he looks so debonair. You did a great job.
ReplyDeleteBeautiful suit! Impeccable work! You have many reasons to be proud :D
ReplyDeleteThat is amazing! Great job. I love having a boy! Your's looks very handsome in his suit.
ReplyDeleteWhat a terrific suit. I hope he has many years of use from it. Your work is amazing, such detail. I am now about to inspect my sewing machine for that hole in the bobbin finger.
ReplyDeleteStunning suit and your son would have had the best fitted suit at the graduation. Congratulations to you both.
ReplyDeleteHe looks very cool. The boy who picked my daughter for his Year 10 formal wasn't nearly as sharp. Thanks for the tip on the horsehair stiffening. I bought a few metres from Tessutis and it made a huge difference to my skirt.
ReplyDeleteThanks for all the lovely comments everyone - the Year 10 Grad is really just a dress rehearsal since he's going on to do Yr 11 and Yr 12 - what are my chances that he'll stop growing for 2 years so that he can wear that suit again????
ReplyDeleteWow, you should be proud of the suit AND the son!
ReplyDeleteWow! What a shrap looking suit. Projects like this are so satisfying. I bet you've walked past it many times just to throw it admiring glances. Now, how to stunt his growth?
ReplyDeleteWow, absolutely amazing job on your son's suit. He looks so handsome in it too! Congrats on his graduation!
ReplyDeleteWhat a handsome man! And what a great suit / clever Mum! Two words: Super Mum.
ReplyDeleteCongratulation on your sons graduation! My son is graduating this year too but I wish I knew more tailoring like you to make him a suit. We will probably take in one of his dads suits. Would to post your project and a photo link to your blog on my Sew & Tell Saturday linky party at my blog this Saturday? Its geared specifically for sewing projects and fabric related crafts. It's a fun way to discover new blogs.
ReplyDeleteJustine @
Sew Country Chick.
Amazing work, handsome son, congrats on graduation.
ReplyDelete